![]()
![]()
Restrictions at the user level are configured by selecting one user at a time and adding one or multiple restrictions, as required.
Each user must be assigned to a group. Restrictions at the group level are configured for one group at a time. The restrictions you configure for a group are applicable to all users in the group.
For example, you can define a CT group and an MRI group and use the procedure below to configure a restriction for each group. This limits the groups to view only CT images or only MRI images. You can then assign a specific user to the required group without having to configure specific restrictions for each individual user.
1. Click Access Control on the Edit System Settings window.
2. From the Tools menu, select Edit
Selected  .
.
3. Select the required user or group.
4. Click OK.
The Access Control window appears, displaying the selected user in the Access Control pane.
5. Do one of the following:
From
the Access Control toolbar, click  .
.
From the Edit menu, select Add Tag Restriction.
Right-click in the Tag/Value pane and select Add Tag Restriction.
The Add Tag Restriction window appears.
6. From the Tag drop-down list, select the DICOM tag of the specific Workflow Manager data that you want to restrict.
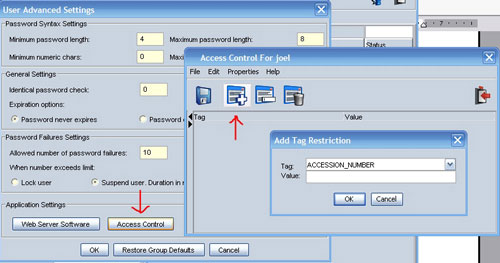
7. In the Value field, enter the predefined value for the selected tag.
NOTE: You can add more than one restriction by inserting a backslash (\) between each specific value. For example, 1\2 allows the user to access studies from site 1 or 2 only.
8. Click OK.
The new access control settings appear in the Tag/Value pane.
9. If required, repeat steps 5 to 8 to add additional restrictions to the same user.
10. Click Save  .
.
When the user in the group requests Workflow Manager data, access is limited according to the restrictions that you defined.
See these topics: