![]()
![]()
Adding new users to the system consists of defining the following information for each user:
General details (for example, the name of the group the user is assigned to).
Login details (for example, the user’s login name and password).
Advanced settings (for example, minimum and maximum password length, password expiration criteria, allowed applications, access control settings).
Profile details are assigned automatically when selecting a group since group selection determines the profile.
External applications, if applicable (for example, access to the voice dictation system and the RIS system).
Edit user permissions (for example, access permissions).
The general and login details are defined for each individual user. The advanced settings are inherited from the group level unless you modify them on the user level. Any settings modified on the user level override the settings inherited from the group level.
After a new user has been defined in the system, the user is required to change the temporary password (assigned initially) at the first login to the system.
1. In the User Management Admin window, select the Users tab.
2. Do one of the following:
From
the User Management toolbar, click Add New  .
.
From the Tools menu, select Add New.
Right-click in the list and select Add new user.
The Add User window appears.
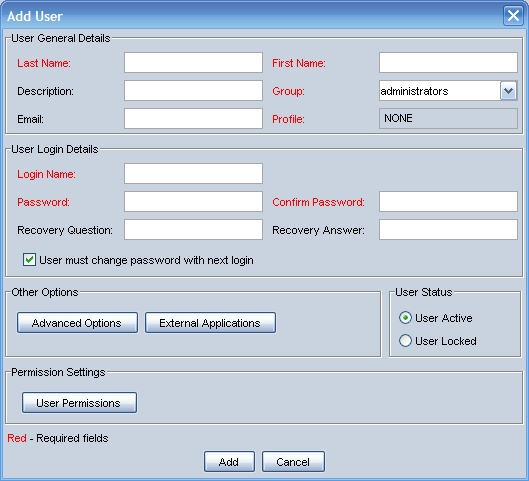
NOTE: Field names in red indicate that the information is mandatory.
3. Enter the user’s general details:
Last Name: The user’s last name.
First Name: The user’s first name.
Description: (Optional) A textual description related to the user.
Group: Select a group from the predefined list of the available groups. Each user must be assigned to a group. See Adding New Groups for more information.
E-mail: The user’s e-mail address.
Role: Each user must be assigned a role in the system. Select a role from the list of default roles:
Group operator: This user has permission only to lock/unlock the users in the group to which the operator belongs and then to change their passwords. This user can view system, group, and user settings, but cannot modify them.
NOTE: The Group operator role should not be assigned to users because this role can modify the settings of the system administrator and group administrator within any group.
Standard: This user only has permission to use the system to log in to products, and therefore has no management permissions or administrative role (for example, a radiologist).
Temporary account: This user only has temporary access to the system and is usually used for an emergency operator. The allowed time period is configured by the administrator and begins the first time the temporary user logs in to the system. When the temporary time period passes, the user is assigned an Expired status.
NOTE: The administrator can modify the validity date of the temporary user’s account.
4. Enter the user’s login details, as follows:
Login Name: The name the user uses to log in to the system.
Password: A temporary password that is valid until the user changes it at the first login.
Confirm Password: Re-enter the user’s temporary password to confirm it.
Recovery Question: (Optional) A question that is asked if the user has forgotten the assigned password. This information must be obtained from the user.
NOTE: If the user forgets the assigned password and this option has not been defined, the user must request a new password from the administrator.
Recovery Answer: (Optional) The answer to the recovery question. This information must be obtained from the user.
User must change password with next login: This option must be selected the first time you enter a user’s details. This lets you assign a temporary password to the user, and the user must change the password at the first login.
This option is selected (checked) by default.
5. In the User Status area, select the required status, as follows:
User Active: The user is active (unlocked) and has permission to access and use the system.
User Locked: The user is not active (locked) and does not have permission to access and use the system.
NOTE: This is the manual method for locking or unlocking a user. A locked user is only allowed back into the system after intervention by a system/group administrator or group operator.
To define advanced options and external applications for this user, see Defining Advanced Settings for Users and Defining External Applications for Users.
6. Click Add.
The new user is added to the list of users displayed in the User Management Admin Window Users tab.
See this topic: